DebuggerStepThrough属性
デバッガの制御系のDebuggerStepThroughAttributeです。
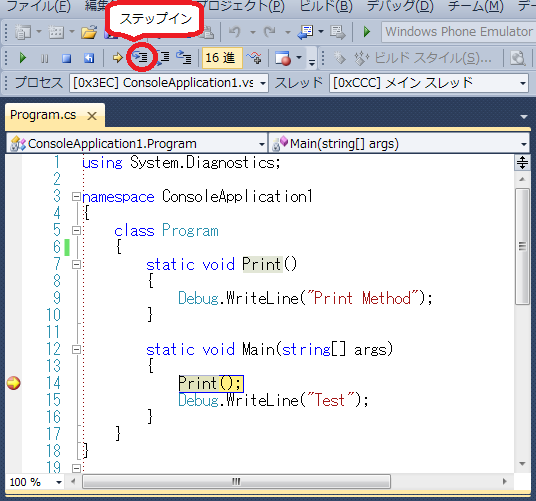
デバッガでステップインの抑制を行います。
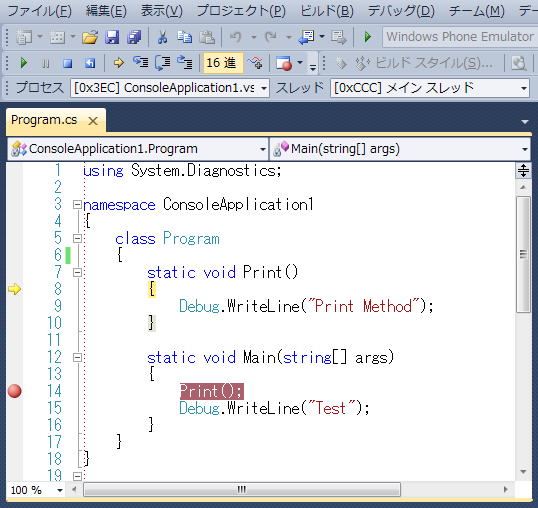
この属性がついているクラス、構造体、メソッド、プロパティがあると、ステップインが実行されず、ステップオーバーと同じ動きになります。
Conditional属性
最近、C#のAttributeについてはまってたりしてます。
なので、いろいろ調べてみた。
まずは、代表(?)的なAttributeのConditionalAttribute。
戻り値なし(void)のメソッドに、属性を付加します。
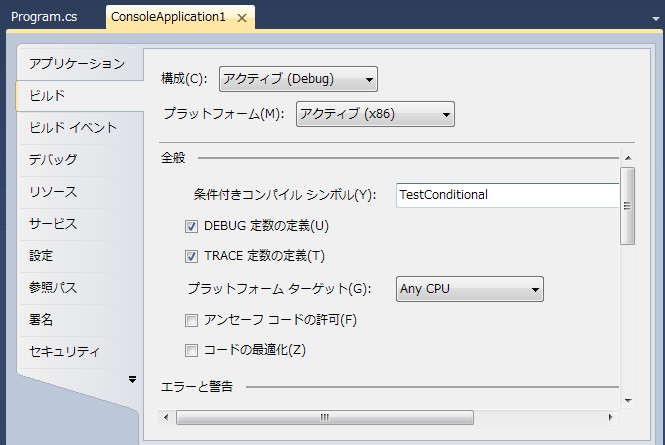
この属性がついていると、プロジェクトのプロパティのビルド、条件付きコンパイルシンボルに定義で、処理の有効/無効が可能になります。
標準で、DEBUGとTRACEの定義はチェックボックスでON/OFFできるようになってます。
それ以外は自分で記述!
using System.Diagnostics;

[Conditional("TestConditional")]
static void Print()
{
    Debug.WriteLine("Print Method");
}

static void Main(string[] args)
{
    Print();
    Debug.WriteLine("Test");
}
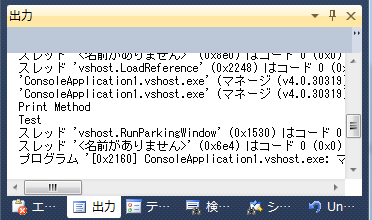
こんな感じ
コマンドマップ
ふと、思いました。
class Program
{
    static void ActionA()
    {
        Console.WriteLine("Action A.");
    }

    static void ActionB()
    {
        Console.WriteLine("Action B.");
    }

    static void ActionC()
    {
        Console.WriteLine("Action C.");
    }

    static void Main(string[] args)
    {
        do
        {
            // コマンド入力
            Console.Write("Input Cmd> ");
            string cmd = Console.ReadLine();
            switch (cmd)
            {
                case "A":
                    // Aコマンドを実行
                    ActionA();
                    break;

                case "B":
                    // Bコマンドを実行
                    ActionB();
                    break;

                case "C":
                    // Cコマンドを実行
                    ActionC();
                    break;
                default:
                    break;
            }
        }
        while (true);
    }
}
上記のサンプルような場合、コマンド増えるごとに、判断する箇所が増えていく・・・
もっと、シンプルに簡単にならないものか?と。
シンプルかつ、簡単にできるなら、後からの追加変更とか容易だし、修正によるバグも少なくなるのでは??
という建前の元、考えてみました。
本当は、コードの量が多く汚くなりそうなんで、嫌だなって単なる我が儘です(笑)
/// <summary>
/// コマンドMap
/// </summary>
static Dictionary<string, Action> _actionMap = new Dictionary<string, Action>();

static void Main(string[] args)
{
    // コマンドを登録
    _actionMap.Add("A", new Action(ActionA));
    _actionMap.Add("B", new Action(ActionB));
    _actionMap.Add("C", new Action(ActionC));

    do
    {
        // コマンド入力
        Console.Write("Input Cmd> ");
        string cmd = Console.ReadLine();
        if (_actionMap.ContainsKey(cmd))
        {
            // コマンド実行
            _actionMap[cmd]();
        }
    }
    while (true);
}
Actionは、.Net3.5で定義されているdelegateのGenericです。
戻り値なしで、引数4個までなら、デフォルトであります。
要は、コマンドと実行メソッドをDictionaryで管理し、実行時にコマンドをキーにして、実行メソッドを呼び出すという仕組み。
これで、増えた場合は、対象のメソッドを作成し、Dictionaryに追加する。消す場合は、Dictionaryの追加部分を削除するだけで、対応できる。
呼び出す部分も、増えていかず、きれいさっぱりに!(笑)
別途、専用にdelegateを定義して行えば、.Net2.0でも、戻り値ありも、引数ありも可能です。
ただし、コマンドの引数、戻り値が共通になっている必要がありますが。
WPFxUPnP 2 その4
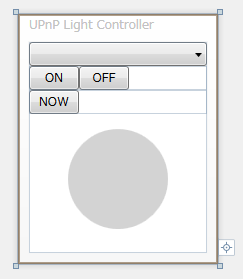
最後に、WPFでの画面です。
デバイスのListを作成して、
public class UPnPLightList : ObservableCollection<UPnPLightDevice>
{
}
デバイスのリストを、依存プロパティとして出して、バインドできるようにしています。
あとは、それぞれ、イベントハンドラを設定して、操作できるようにしています。
public partial class MainWindow : Window
{
    public MainWindow()
    {
        InitializeComponent();
        DataContext = this;
    }

    // デバイス検索オブジェクト
    DeviceFinder deviceFinder = new DeviceFinder();

    // ロードイベントハンドラ
    private void OnLoaded(object sender, RoutedEventArgs e)
    {
        deviceFinder.AddEvent += (addDevive) =>
            {
                // デバイス追加
                try
                {
                    LightList.Add(new UPnPLightDevice(addDevive));
                }
                catch (Exception) { }
            };

        deviceFinder.RemoveEvent += (removeDeviceUDN) =>
            {
                // デバイス削除
                try
                {
                    foreach (UPnPLightDevice one in LightList)
                    {
                        if (one.Device.UniqueDeviceName == removeDeviceUDN)
                        {
                            LightList.Remove(one);

                            Marshal.ReleaseComObject(one.Device);
                            break;
                        }
                    }
                }
                catch (Exception) { }
            };

        // デバイス検索開始
        deviceFinder.FindDeviceAsync("urn:schemas-upnp-org:device:DimmableLight:1");
    }

    // ライトデバイスリスト
    public static readonly DependencyProperty LightListProperty = DependencyProperty.Register("LightList",
                                                                      typeof(UPnPLightList),
                                                                      typeof(MainWindow),
                                                                      new PropertyMetadata(new UPnPLightList()));
    // ライトデバイスリスト
    public UPnPLightList LightList
    {
        get { return (UPnPLightList)this.GetValue(LightListProperty); }
        set { this.SetValue(LightListProperty, value); }
    }

    // Closeイベントハンドラ
    private void OnClosed(object sender, EventArgs e)
    {
        deviceFinder.CancelFindDeviceAsync();
    }

    // ONボタンクリックイベントハンドラ
    private void LightOn_Click(object sender, RoutedEventArgs e)
    {
        try
        {
            UPnPLightDevice dev = (UPnPLightDevice)(DeviceList.SelectedItem);
            dev.SetTarget(true);
        }
        catch (Exception) { }
    }

    // OFFボタンクリックイベントハンドラ
    private void LightOff_Click(object sender, RoutedEventArgs e)
    {
        try
        {
            UPnPLightDevice dev = (UPnPLightDevice)(DeviceList.SelectedItem);
            dev.SetTarget(false);
        }
        catch (Exception) { }
    }

    // 状態取得ボタンクリックイベントハンドラ
    private void LightStatus_Click(object sender, RoutedEventArgs e)
    {
        try
        {
            UPnPLightDevice dev = (UPnPLightDevice)(DeviceList.SelectedItem);
            ResultStatus.Text = (dev.GetStatus() ? "ON" : "OFF");
        }
        catch (Exception) { }
    }
}
OnLoadedで、UPnPデバイスの検索をかけて、追加・削除に応じて、作成したデバイスリストを生成して、追加します。
すると、デバイスが見つかった場合、インスタンスを作成し、リストに登録。
WPFのフレームワークにより、リストに登録され表示されるようになります。
後は、イベントハンドラで、対象のインスタンスを操作して、UPnPデバイスを操作します。
XAMLは、こんな感じ。
<Window x:Class="UPnPLightController.MainWindow"
        xmlns="http://schemas.microsoft.com/winfx/2006/xaml/presentation"
        xmlns:x="http://schemas.microsoft.com/winfx/2006/xaml"
        Title="UPnP Light Controller" Height="250" Width="200" x:Name="Main"
        ResizeMode="NoResize" Loaded="OnLoaded" Closed="OnClosed">
    <StackPanel>
        <ComboBox x:Name="DeviceList" IsReadOnly="True"
                  ItemsSource="{Binding Path=LightList,ElementName=Main}"
                  DisplayMemberPath="Device.FriendlyName"/>
        <StackPanel Orientation="Horizontal">
            <Button x:Name="LightOn" Width="50" Content="ON" Click="LightOn_Click" />
            <Button x:Name="LightOff" Width="50" Content="OFF" Click="LightOff_Click" />
        </StackPanel>
        <StackPanel Orientation="Horizontal">
            <Button x:Name="GetStatus" Width="50" Content="NOW" Click="LightStatus_Click" />
            <TextBlock x:Name="ResultStatus" Width="50" />
        </StackPanel>
        <Ellipse Height="100" Width="100" Margin="15"
                 IsEnabled="{Binding Path=SelectedItem.Status, ElementName=DeviceList}">
            <Ellipse.Style>
                <Style TargetType="{x:Type Ellipse}">
                    <Setter Property="Fill" Value="LightGray" />
                    <Style.Triggers>
                        <Trigger Property="IsEnabled" Value="True">
                            <Setter Property="Fill" Value="Yellow"/>
                        </Trigger>
                    </Style.Triggers>
                </Style>
            </Ellipse.Style>
        </Ellipse>
    </StackPanel>
</Window>
これで、完成。
WPFxUPnP 2 その3
WPFxUPnP 2 その3
public class UPnPLightDevice : INotifyPropertyChanged
{
    public UPnPDevice Device { get; set; }
    public UPnPService SwitchPowerService { get; set; }

    public UPnPLightDevice(UPnPDevice pDevice)
    {
        try
        {
            Device = (UPnPDevice)Marshal.GetUniqueObjectForIUnknown(Marshal.GetIUnknownForObject(pDevice));

            SwitchPowerService = Device.Services["urn:upnp-org:serviceId:SwitchPower:1"];
            SwitchPowerService.AddCallback(this);
        }
        catch (Exception)
        {
            if (SwitchPowerService != null)
            {
                Marshal.ReleaseComObject(SwitchPowerService);
            }
            if (Device != null)
            {
                Marshal.ReleaseComObject(Device);
            }
            throw;
        }
    }

    #region INotifyPropertyChanged
    public event PropertyChangedEventHandler PropertyChanged;
    #endregion

    bool _Status = false;
    public bool Status
    {
        get { return _Status; }
        set
        {
            _Status = value;
            if (PropertyChanged != null)
            {
                PropertyChanged(this, new PropertyChangedEventArgs("Status"));
            }
        }
    }
コンストラクタで、DeviceFinderで見つけたUPnPDeviceを残し、そこから、urn:upnp-org:serviceId:SwitchPower:1サービスを取得します。
後は、ライトの値をプロパティとして、出して、値が変わるとINotifyPropertyChangedを用いて、WPFへ変更通知を送るようにしています。
そして、urn:upnp-org:serviceId:SwitchPower:1のアクションをそれぞれ定義します。
    public void SetTarget(bool status)
    {
        object[] inarg = new object[1] { (status ? 1 : 0) };
        object[] outarg = new object[1];
        SwitchPowerService.InvokeAction("SetTarget", inarg, outarg);
    }

    public bool GetTarget()
    {
        object[] inarg = new object[1];
        object outarg = new object();
        SwitchPowerService.InvokeAction("GetTarget", inarg, ref outarg);
        return (bool)(((object[])outarg)[0]);
    }

    public bool GetStatus()
    {
        object[] inarg = new object[1];
        object outarg = new object();
        SwitchPowerService.InvokeAction("GetStatus", inarg, ref outarg);
        return (bool)(((object[])outarg)[0]);
    }
あと、SwitchPowerService.AddCallback(this);で、urn:upnp-org:serviceId:SwitchPower:1サービスの状態変更通知を貰えるように、設定します。
AddCallbackで指定するには、IUPnPServiceCallbackインターフェースを継承する必要があります。
よって、クラス定義が次のようになります。
public class UPnPLightDevice : IUPnPServiceCallback, INotifyPropertyChanged
{
・・・(省略)・・・
    #region IUPnPServiceCallback
    public void ServiceInstanceDied(UPnPService pus)
    {
        Marshal.ReleaseComObject(pus);
    }

    public void StateVariableChanged(UPnPService pus, string pcwszStateVarName, object vaValue)
    {
        try
        {
            if (pcwszStateVarName == "Status")
            {
                Status = ((bool)vaValue);
            }
        }
        catch (Exception) { }
        finally
        {
            Marshal.ReleaseComObject(pus);
        }
    }
    #endregion
}
可変引数は、マーシャリングできるのか!?
ということで、今回は、C/C++で作成されたDLLの可変引数関数は、C#からマーシャリングできるのかを議題にやってみようと思う。
まず、C/C++のDLLのコード。
これは単純に、コンソールに出力するだけの簡単な関数にしてみました。(つまり、printf関数です)
宣言のヘッダーは、至って普通の宣言です。
#define WIN32_LEAN_AND_MEAN
#include <windows.h>

#ifdef PRINT_EXPORTS
#define PRINT_API __declspec(dllexport)
#else // PRINT_EXPORTS
#define PRINT_API __declspec(dllimport)
#endif // PRINT_EXPORTS

#ifdef __cplusplus
extern "C"
{
#endif // __cplusplus

void PRINT_API WINAPI PrintStringW(LPCWSTR lpszFormat, ...);
void PRINT_API WINAPI PrintStringA(LPCSTR lpszFormat, ...);

#ifdef __cplusplus
}
#endif // __cplusplus
BOOL APIENTRY DllMain( HMODULE hModule,
                    DWORD  ul_reason_for_call,
                    LPVOID lpReserved
                     )
{
    UNREFERENCED_PARAMETER(hModule);
    UNREFERENCED_PARAMETER(ul_reason_for_call);
    UNREFERENCED_PARAMETER(lpReserved);
    return TRUE;
}

void PRINT_API WINAPI PrintStringW(LPCWSTR lpszFormat, ...)
{
    va_list args;
    va_start(args, lpszFormat);

    vwprintf(lpszFormat, args);

    va_end(args);
}

void PRINT_API WINAPI PrintStringA(LPCSTR lpszFormat, ...)
{
    va_list args;
    va_start(args, lpszFormat);

    vprintf(lpszFormat, args);

    va_end(args);
}
では、マーシャリングにトライです。
関数の定義をそのまま、マーシャリングの定義に置き換えると次のようになります。
[DllImport("print.dll")]
extern static void PrintString(string format, params object[] args);
PrintString("Print %d\n", 1);
マーシャリングはFrameworkが対応の型にあわせて、値を変換し、関数を呼び出してくれているためで、
利用側が使用する型を不明の場合(可変引数など)、どのように変換して良いのか不明のため、
うまく変換できずに、値を渡しているため、おかしな値になっています。
なので、呼び出しにintを渡すのであれば、定義を次のようにすると正しく、表示されるようになります。
[DllImport("print.dll")]
extern static void PrintString(string format, int num);
おまけ。
呼び出しがprintf関数の場合、次のようにして、文字列にしてしまえば容易です。
[DllImport("print.dll")]
extern static void PrintString(string str);

static void PrintStringWrapper(string format, params object[] args)
{
    PrintString(string.Format(format, args));
}
PrintStringWrapper("Print {0}\n", 1);
ログ出力時の呼び出し元関数名を出力する
ログ出力など可変引数を利用して出力している場合、呼び出し元の関数名を出力は容易ではない。
そのために、ゴソゴソしてみた。
出力するログ出力側で、引数で渡せば容易だが、そんなのはめんどくさい!
そんなめんどくさをなくすサンプル。
まずは、__VA_ARGS__マクロ版。__VA_ARGS__は無い場合があるので、要注意。
#include <windows.h>

#define LOG_PRINT(x, ...)    CLogOut::Out(_T(__FUNCTION__), x, __VA_ARGS__)

class CLogOut
{
public:
    CLogOut(void) { };
    ~CLogOut(void) { };

    static void Out(LPCTSTR lpszFuncName, LPCTSTR lpszFormat, ...)
    {
        va_list args;
        va_start(args, lpszFormat);

        TCHAR szBuffer[1024] = { 0 };
        _vstprintf(szBuffer, lpszFormat, args);

        _tprintf(_T("[%s] %s\n"), lpszFuncName, szBuffer);
        va_end(args);
    };
};

int _tmain(int argc, _TCHAR* argv[])
{
    LOG_PRINT(_T("Test"));
    LOG_PRINT(_T("many args %d %s %c"), 1, _T("Test"), 'C');
    return 0;
}
__VA_ARGS__マクロが無い場合は、C++のクラスをうまく利用すると、いい感じにできる。
その場合は、こんな感じ。
#include <windows.h>

#define LOG_PRINT	CLogOut::CLogOutHelper(_T(__FUNCTION__)).Out

class CLogOut
{
public:
    class CLogOutHelper
    {
    public:
        CLogOutHelper(LPCTSTR szFuncName)
        {
            m_szFuncName = szFuncName;
        };

        void Out(LPCTSTR lpszFormat, ...)
        {
            va_list args;
            va_start(args, lpszFormat);
            CLogOut::Out(m_szFuncName, lpszFormat, args);
            va_end(args);
        };

    private:
        LPCTSTR m_szFuncName;
    };


public:
    CLogOut(void) { };
    ~CLogOut(void) { };

    static void Out(LPCTSTR lpszFuncName, LPCTSTR lpszFormat, va_list args)
    {
        TCHAR szBuffer[1024] = { 0 };
        _vstprintf(szBuffer, lpszFormat, args);

        _tprintf(_T("[%s] %s\n"), lpszFuncName, szBuffer);
    };
};

int _tmain(int argc, _TCHAR* argv[])
{
    LOG_PRINT(_T("Test"));
    LOG_PRINT(_T("many args %d %s %c"), 1, _T("Test"), 'C');
    return 0;
}
